| Flotation and Sea Kayaks
What follows is
the original manuscript that was edited down to basic essentials to become the flotation
article in the June 1995 (p46) issue of Sea Kayaker magazine. Since the web
doesn't have the length limitations of a magazine article we are providing the full (well
over twice as long) manuscript here complete with examples, anecdotes and more details for
those who wish to delve deeper into this most important topic. Blue
print is new material added 4/07.
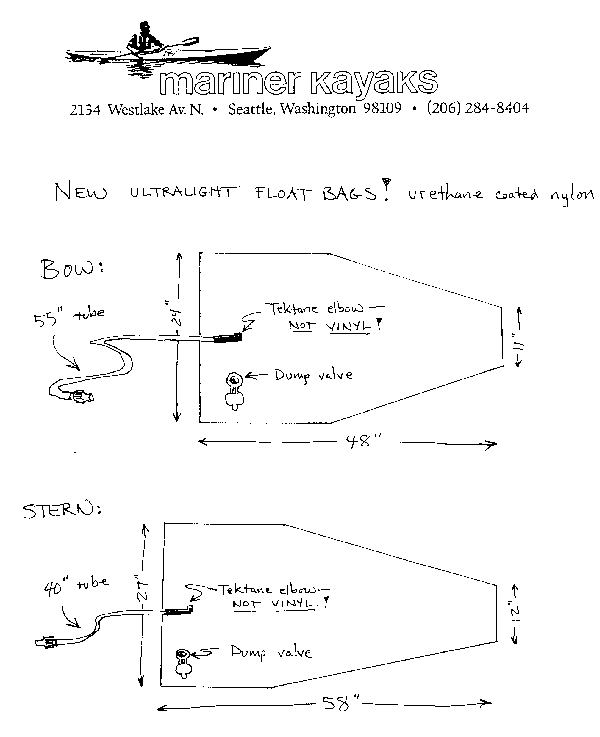
While reading the safety articles in several recent issues of Sea Kayaker magazine I was reminded that the one factor that usually determines if an incident becomes serious enough to rate attention by outside rescuers (and Sea Kayaker magazine) is still how well the kayaks involved float after a capsize or swamping. I have talked to several kayakers recently who have told me (or somehow revealed) that they have little or no flotation when paddling on day trips. Some of these people have been paddling for years and have never capsized either accidentally or on purpose. When I've asked them what they would do if they did capsize most seem to think they will just climb over the rear deck and get back in the kayak. I explain to them that not only will the kayak be unstable side to side because of the "free" water but it will also be unstable end for end and when they add their weight to the rear deck all the water inside will flow to that end and sink it. I'm not sure I'm getting through to them. Because I run a kayak store I get the feeling that some of the flotationless kayakers perceive my concern more like an insurance salesman using scare tactics to hustle a couple of float bags. There are many other paddlers in serious danger because they believe they have enough flotation when in fact it is dangerously inadequate. "My kayak won't sink because it is made out of wood" is probably the most common of the myths with which they deny their vulnerability. These future victims either have never capsized or if they have it was under the best of conditions. Maybe they haven't given much thought to how their flotation (if they have any at all) may be not be enough, can fail, or might be compromised by their actions before or after a capsize. For example was the guide, in the Spring 1994 (Vol. 10 #4, page 50) issue of Sea Kayaker magazine (or Sea Kayaker Deep Trouble chapter 18), thinking about how his stern flotation would be effected if he needed to get his VHF radio at the time he put it in his rear compartment? When he made the choice to open that compartment from the water to call for help did he realize what might (and subsequently did) happen? If he had understood the risks maybe he could have gotten the radio quickly and closed up the hatch again before a wave a swamped and sank his kayak. If he had considered a rough water rescue scenario in advance he would most likely not have stored the VHF radio in the flotation compartment. If he had no other choice he could at least have made it quickly accessible without also having to remove any of what could have been his back up flotation (the dry bags full of clothes he removed and handed to another victim to hold while he got the radio). Few kayakers realize that opening a hatch while on the water can have serious consequences even if it is calm and there are other kayakers around to help. One good wave (or tilt to the kayak) and a lot of water can come in through the hatch. The question then is: how do you remove all that water from inside the compartment without also leaving the hatch open and therefore vulnerable to other waves? (The Sea Kayaker magazine boat tester's comments that parts of a kayak hatch system aren't tethered to the kayak may be revealing an assumption that a hatch can reasonably be opened while out on the water.) Most of those I discovered who did not use flotation were from out of the Seattle area and had started paddling on their own where there weren't instructors or clubs to help them become religious about flotation. I may be preaching to the already converted but please don't stop reading here, even if you are well aware of the need for flotation, you may learn something when we go into detail on the weaknesses of different flotation systems and the best back-ups for each type. By relating some of the unexpected occurrences I've seen, experienced, or have read (and written) about in past issues of Sea Kayaker, I hope to stimulate your thinking and motivate you to test your own kayak's flotation system. I will review some of the basics, discuss the most common flotation systems, and look at some of the myths kayakers use to delude themselves into thinking they will be safe. How much flotation is enough? Any additional buoyancy beyond the minimum necessary to perform a rescue makes it that much easier because there will be less water to pump out as well as a higher freeboard that can help keep waves from refilling the kayak during bailing. Another reason to maximize flotation is that the more water free to slosh around in a hull the less stable it is. This is why temporary support is usually necessary to prevent another capsize during the pumping out process. The temporary support can come from another kayaker, a paddle float fastened to one end of the paddle with the other end firmly attached to the kayak like an outrigger, or floats fixed to the sides of the kayak. Many paddlers don't realize the importance of flotation in each end of the kayak. The sad truth is: flotation in only one end of the kayak is not much better than no flotation at all. In the Winter 1985 issue of Sea Kayaker (Vol. 2 #3) (or Sea Kayaker Deep Trouble chapter 3) I wrote about a kayaker who had just installed a rear hatch and bulkhead in the used kayak he bought. The kayak had flotation bags in each end when he bought it. I can only speculate that he thought that his kayak was safer with one bulkhead than with the bow and stern float bags because he is no longer alive to tell us. His kayak was found floating bow down and the float bag for the bow was back at home. Several kayakers have told me that their kayak doesn't need extra flotation because it is made out of wood and therefore naturally floats. This is a dangerous yet far too common myth. The wood kayak or one with minimal flotation may not sink but its paddlers will not be able to use it to lift themselves much out of the cold water. It is the cold water that kills! Even a folding kayak with an inflation collar may not have enough flotation unless additional buoyancy is added. What is the minimum flotation necessary to make it possible to rescue a fully swamped sea kayak? Sea water weighs 64 pounds per cubic foot (fresh water is 62.5 pounds). Since a paddler might weigh anywhere from under 100 to over 300 pounds and a gear load may be from zero to up to 200 pounds, the volume of buoyancy necessary to fully support the paddler out of the water is going to vary widely. Because of this wide variation in paddlers' weight, it is important to personally test your own kayak both when empty and with as heavy a gear load as you might possibly carry. Heavy paddlers and a heavy gear load might not be compatible with a smaller volume kayak because even the maximum possible buoyancy may not be enough. It takes even more buoyancy to have the kayak floating high enough so that waves do not wash right over the cockpit during bailing. Buoyancy is even more critical in a double kayak. Most double kayaks don't have much more flotation than a single. However, many times more water must be bailed once a double is in the fully swamped condition. As the accident reports in the Winter 93 (Vol. 10 #3) and Spring 94 (Vol. 10 #4) issues of Sea Kayaker magazine (Sea Kayaker Deep Trouble chapters 17 and 18) show, swamped doubles have been called on to support up to four paddlers at once. The minimum survivable buoyancy is going to vary with the weight of the paddler(s) and the size of the kayak, but I have never heard of a sea kayaking accident caused because the kayak had too much buoyancy. Back in 1983 after an accident in which a kayaker died possibly because of inadequate buoyancy in his kayak (Sea Kayaker Spring 84, Vol. 1 #1), I tested some kayaks to find out how much of a kayak's volume would need to be permanently filled (with a closed cell foam installed during manufacture) to assure that there would always be at least adequate flotation to perform a self-rescue. I did some experiments in a pool and it became clear that a cubic foot or two in each end was just not going to be adequate flotation for the job. Also, using up even that much potential storage space with foam buoyancy wouldn't be acceptable to most paddlers who wanted to camp out of their kayaks. The campers would see it as giving up a lot of storage space because a few kayakers didn't bother to find out they needed flotation (or knew but failed to exercise good judgment). Worse still, I realized that by installing some flotation in a kayak many paddlers would believe that there was enough flotation and not add any additional to it. Partial flotation might actually create more serious incidents because the need for additional flotation would be less obvious than in a kayak that had no flotation at all. An incident I reported in the second issue of Sea Kayaker (Summer 84, Vol. 1 #2)(or Sea Kayaker Deep Trouble chapter 1) clearly demonstrates this unfortunate phenomenon. The victim (who had been paddling his 36" wide double kayak for ten years) writes: "Although I had never test-swamped it, I trusted the sealed air chambers in the bow and stern. Strike two! Within minutes of righting the kayak, and climbing back into the cockpit, the stern had sunk and to our infinite dismay all that remained to hang onto was a couple of feet of bow." These paddlers survived because the only passing boater they had seen all morning was curious about a "bird" he saw awkwardly flapping its wings in the distance. On changing course to investigate he found the "bird" was two paddlers who had nearly given up hope. They had been waving their arms wildly in a last desperate attempt to be noticed. Even if the stern chamber hadn't leaked, it and the bow compartment together would only have been enough to prevent the kayak from sinking, but not nearly enough to support its occupants as well. The main lesson here is: don't put your faith in what you haven't put to the test! It has been my experience that the amount of volume enclosed as flotation in the stern is the most important to the rescueability of single kayaks. I'm not saying bow flotation isn't important, only that maximizing bow flotation, while desirable, is less likely to be as critical in a rescue as maximizing stern flotation. This is because a sitting paddler's center of gravity (near the belly button) is much nearer to the stern buoyancy than the bow buoyancy. Also, during most rescues, in order to get your legs into the cockpit, the majority of your weight is behind the cockpit and supported by the rear buoyancy. Most paddlers don't realize just how much buoyancy is needed in the stern. I once helped a capsized kayaker get back in his kayak only to find that his stern sank until the cockpit rim was several inches under water. This kayak had a float bag (of the size meant for the bow of a white water river kayak) in each end. The kayak manufacturer was supplying the bags for this kayak. Apparently they had never tried a rescue in which the kayaker gets up out of the cold water before bailing the kayak. Upon calling the company and relating my experience, I learned that they used a small float bag in the stern because they wanted to have room left over to store gear. The (not uncommon) assumption was that a large float bag that filled the space available would not be compatible with additional gear bags. The reality is that a large float bag can be deflated as much as necessary to accommodate as much gear as the kayak itself can hold. Gear bags and float bags can work together to fill all the space available with buoyancy. I called the kayak designer as well as the manufacturer. The flotation system was later changed. The above rescue experience also taught me that it is possible to pump out a kayak through the spraydeck even if the cockpit is below the water (at least if the spraydeck can be kept in place during the pumping). In this case the spraydeck kept slipping off the coaming so one of us had to carefully hold it in place while the other worked the pump through the waist opening in front of the paddler's belly. Common flotation systems 1) Air filled bladders designed to fit in the ends of a kayak, commonly known as "float bags". Usually one float bag goes in each end of the kayak. With this system large gear bags that replace or partially replace the bladders become the "float bags" when a large gear load is carried. 2) Another way to contain buoyancy is to install watertight bulkheads to wall off flotation in the bow and stern. 3) A system that separates the paddler from the rest of the kayak using either a flexible bag known as a "sea sock" or a rigid box known as a "pod". Both surround the paddler's lower body and seal at the cockpit rim. 4) Take the pod concept one step further (by removing the cockpit rim and the deck from above the paddler's legs) and you have an open top kayak. 5) Many folding kayaks have an inflatable collar that goes along both sides of the kayak. While its prime function is to tighten the skin of these kayaks (and/or increase stability) it does provide part of the necessary flotation (but usually not enough to make the swamped kayak easy to rescue). Whatever system you use to maintain secure flotation the volume of buoyancy should take up most of the space not taken up by the paddler. Float bags Many novices want smaller float bags "so I will have some room to store my gear". Doing this is a serious mistake. The space needs to be filled with secure buoyancy, it doesn't matter if the buoyancy is provided by partially inflated float bags and part of it is provided by large watertight bags that contain and are "lofted" by your gear. If you use this system remember the word secure. Smaller gear bags that can float out of the kayak between foot pedals or out from behind the seat should not be considered as part of your buoyancy unless they are firmly secured in place. One way smaller gear bags can be secured is by placing them under the float bags to hold the gear weight low and keep it from shifting. Smaller bags can be tied in place or held from slipping out by netting, straps, or in a larger bag. If you need to fill the whole boat with gear, the float bags come out and the gear bags provide the flotation. In that case, roll up your float bags and carry them with you. Blow them up for flotation whenever leaving your gear bags on shore, such as on a day paddle from a campsite. Put smaller gear bags in the ends for a better fit and so the largest gear bags act as a plug to hold them in the kayak. By using the largest size gear bags that fit you will lessen the chance that they might slip out during a capsize and rescue. Make sure your gear bags fill as much of the kayak as possible to minimize the water you will need to bail if you capsize. Try not squeezing as much air out of the gear bags before closing them when you are carrying less than a full load. Test the system you use by fully swamping the kayak and then pushing each end under water. Check that the water in the end you push down can't float out the gear bags or float bags. If you capsize and wet exit make a quick mental review of your flotation situation before righting the kayak. If you realize you've been lax, be very careful you don't make things much worse. (For instance: you realize you were too lazy to blow up your float bags for that short sunset paddle around the lovely island you camped on. You had rationalized that you would stay close to shore but now the current is whisking you away from the island. Your friends (whose presence also lulled you into a false sense of security) have already rounded the point while you took a picture and are now out of earshot. This could be your last sunset! Well, maybe there is still a little hope if you don't blow it without thinking by righting the kayak and releasing the air trapped inside it. Can you attach anything that will contain the air in your kayak? A seasock? A cockpit cover? Hopefully you didn't also leave your spraydeck back at camp. If you can Eskimo roll you might be able to reenter the cockpit and fasten the spraydeck before rolling, but alas learning to roll was not one of your priorities either. Try removing your spraydeck and sealing off the cockpit without tilting the kayak and burping out the air trapped inside. If you succeed in attaching the spraydeck use the shoulder straps to tie off the waist hole, thereby closing the cockpit and trapping the air that remains. Right the kayak and lay over it to get your trunk out of the water, using your feet in the water for balance (or very carefully perform a self-rescue). Even if you have no sprayskirt the following might succeed but the risk of sinking the kayak will be greater. Try to climb onto the overturned hull in such a way that you don't tip the kayak much either side to side or down at either end. You may be able to paddle it like a surf board from your belly while striving to keep it upside down and level so you don't burp out the air trapped within the kayak. About the time it gets really dark your friends will get concerned and after much discussion decide to come looking for you. Of course they will search the entire shoreline first. Hopefully they will be aware of the current's speed and direction so they will know where to look when they don't find you on shore. Too bad you didn't take a flashlight or flares. Most likely by this time if you didn't get up out of the water you no longer have the strength to cling to the bow toggle of your vertical kayak.) Leaving your float bags in place during storage saves having to blow them up when you want to use the kayak. You can tell they have no slow leaks if they have been holding air for a considerable time. A slow leak in a floatbag you just inflated could mean you will be losing buoyancy as you paddle without realizing it. Float bags can be removed or go flat so you must always check that they are in place and inflated before using your kayak. Float bags can be punctured, most likely by a fiberglass burr, sharp screw from a through hull fitting, or by being pinched by the foot pedals. If your kayak uses float bags it would be a good idea to tape some sandpaper to a long stick and sand the areas inside your boat most likely to contain burrs or sharp points (along the edges of the seam tape in fiberglass kayaks). To protect float bags and gear bags from snagging and tearing, screws or rivets with sharp edges or points should be covered. Silicone sealer covering the sharp edges (or a domed nut that the screw doesn't protrude beyond) usually works well. (Your gear bags will last longer if you smooth over the sharp points within any kayak type.) Air leaks in float bags are often very slow. The leaking flotation bag can be used in an emergency if they cannot be immediately repaired. Top the leaking bag up on a regular basis and employ a back up system (i.e., use a seasock or inflate the paddle float and fill all gearbags with loose bulky items or brush). Some float bags [such as those we sell] have a long enough filler tube with a valve in the end so in calmer conditions (or with help stabilizing the kayak) topping them up is possible while you remain in the cockpit. If you depend on a float bag system for kayak buoyancy your repair kit should contain a patch kit. Duct tape may able to slow a leak until a more permanent repair can be made.Tugging on the long inflation tube can tear the vinyl at the joint with the bag in some float bags creating a leak large enough to deflate the bag quickly. This is a very difficult area to patch. As tempting as it may be to use as a handle and rope, do not pull on the long tube to remove a float bag from the kayak. [Added note:Mariner Kayak's floatbags use a much tougher red "techtane" polyurethane elbow rather than the more common clear vinyl one but even though we haven't seen a failure we still don't think tugging on it hard is a good idea.] Another way a float bag can fail is to become so pressurized it pops. I have accidentally popped air mattresses by filling them fully at low altitude and then driving to a high altitude. If your destination is over the mountains leave considerable room for expansion and then top float bags up with air when you arrive at your paddling destination. Blowing float bags up tight on a cold morning and then setting the kayak in the sun on a hot afternoon, especially in a dark colored kayak, could conceivably pop them but I have never heard of it happening. I have however accidentally popped a vinyl/nylon float bag by over inflating it (outside the kayak) with an air compressor. Years ago I heard rumors of a whitewater kayak being ripped open at the seams due to float bag expansion driving over a mountain pass. I have also read of hatches blowing off due to air expansion (Sea Kayaker Fall 1986, Vol. 3 #2 p44) and have seen a foam bulkhead blown out of the bow of a double kayak by air pressure as the bow was squeezed by a breaker . If your flotation system (of whatever type) is totally airtight consider the possible effects of changes in air pressure.Damage due to air expansion caused by heat would be unlikely to happen on the water because the water usually helps keep the kayak cool. (An exception would be bringing a kayak into a warm swimming pool on a very cold day.) Air chambers that help shape some folding kayaks and inflatable boats often need to be topped up once the craft is on the water because of the air pressure they depend on for stiffness is lowered by cooling. I inflate float bags to mostly full, but not tight, thereby leaving a little room for expansion. However, float bags tightly inflated in place are less likely to float up if you push one end of a swamped kayak down. Float bag users will need to decide for themselves which is the most likely hazard in their particular kayak and situation. Obviously, with a sea sock or bulkheads backing them up, there would be little advantage to inflating the floatbags tightly. Another place that float bags can be vulnerable is the valves. Years ago the valves on the end of the long fill tubes of some float bags were subject to leakage (the manufacturer of that valve now has a screw down feature that has fixed the problem). Although I've never experienced or heard about leakage due to sand contamination of the valve I imagine it could happen to an open valve set in the sand. The large dump valves on all the floatbags I have seen have all been secure against pressure and leakage but let me relate one experience in the surf. My paddling partner was trying to quickly adjust his foot pedals by using both feet. Without his realizing it the edge of his shoe had somehow opened the large dump valve. Later he capsized in a big breaker and failed to roll. He reentered the kayak between breakers and rolled up by grabbing the bow of another paddler's kayak. His cockpit was full and he turned to head for the beach. I recall thinking that his kayak must be really swamped because it was looking especially low at the bow. A few seconds later his bow submerged like a submarine and he was scrambling to get out as the kayak was progressing towards a vertical position. The buoy like kayak was especially difficult for me to tow into shore even though I had a long throw line. We now use a sea sock to back up the float bags when surfing. The extra buoyancy provided by the seasock also helps protect the kayaks from damage if they are swept into the shore without us. Take float bags on overnight trips even if your gear bags totally fill the space available. Having your rolled up float bags along allows you to leave your gear and dry bags in camp and still paddle your kayak. The disadvantage is you will need to blow your float bags up by mouth since you probably don't have a compressor or vacuum cleaner outlet handy to make it easier. (Note: One of our customers, Mark Bishop, made himself a float bag inflator by making a short tube that connects the big dump valve in the float bag to the big dump valve in a tapered gear bag. He scoops a bunch of air into the gear bag and then squeezes it into the float bag). One paddler (Sea Kayaker Vol. 3, # 3) (or Sea Kayaker Deep Trouble chapter 7) who paddled without any flotation after leaving his gear bags in camp was lucky. His lack of flotation resulted in the loss of his kayak, a paddle, and a small amount of blood. There was also a considerable loss of face (a condition that can be painful but is rarely life threatening). Bulkheads (and Hatches) Bulkheads, by walling off part of the hull to create a flotation chamber, also create the need for a way to get into that space to store camping gear. Many new paddlers view hatches as a convenience feature and don't realize their true purpose is to provide access to the walled off buoyancy chamber. Opening a hatch at sea can have dire consequences because the flotation function is compromised or destroyed (depending on what is backing it up). To provide secure flotation hatches must seal well enough that the kayak's flotation will not be compromised. If they don't seal all that well (or there are leaks elsewhere they should be backed up by a floatbag or waterproof gear bags that fill the compartment. Those bags should be large enough they won't easily float out if the hatch gets open. Most kayakers consider hatches and bulkheads to be a secure flotation system but the U.S. Coast Guard apparently does not share that view. Most small craft must be manufactured to meet the Coast Guard's "level flotation requirement". Simply walling off a part of the hull to provide flotation is not considered adequate by the Coast Guard. Closed cell foam or a separate bladder inside the walled off area is required. (Note: Canoes and kayaks are specifically exempted from the Coast Guard's "level flotation" requirement for small craft.) The hatches I have seen on sea kayaks have varied from very watertight and secure to downright dangerous. The quality of the seal and their resistance to dislodging has improved greatly over the years on commercial kayaks but few are truly watertight. A general rule is: the bigger the hatch the easier it is to load gear into and the more difficult it is to make really watertight. Ocean surf can be a real test of the security of a flotation system. In the Summer 1986 issue (Vol. 3 #1) (or Sea Kayaker Deep Trouble chapter 5)I wrote about a kayaker capsized by a breaking wave while trying to paddle up the river mouth at Lapush, WA. "When his head broke the surface his kayak was twenty or thirty feet away. Halfway between him and the boat was the rear hatch cover floating right side up in the foam." The kayak sank and he was swept out the river mouth and into an area of huge surf. He swam through the surf until, seriously hypothermic and exhausted, he was spotted floating helpless in the heavy beach surge. There was an extremely high tide and he was in imminent danger of being crushed between the many beach logs jostling him as he sloshed up and down the beach. A bystander risked his life to drag him out from among the surging beach logs. One lesson here is that hatches must be fastened in place securely enough to withstand a serious test or your flotation could be instantly lost. Disadvantages of bulkheads and hatches are: 1. More expensive. 2. Most of your gear must be put through a smaller opening so the size of individual pieces of gear is limited by the size of the hatch opening. Longer items often can't "turn the corner" into the compartment. 3. Stiff bulkheads create stress-risers possibly leading to damage and wear areas where the hull is unable to flex. A friend's kayak banged against a rock near the stern bulkhead as he was struggling with it in the surge on a rocky ledge; the shearing force tore the hull open for about eight inches right along the bulkhead. Had the bulkhead not been there the hull would have flexed, absorbing the blow, and popped back out again without serious damage. 4. Our friend, Robert Livingston, tells a story about
watching his homemade fabric bow hatch cover rhythmically bulge up and then
retract down when paddling in large waves. He realized that waves flexing the
hull were alternately increasing and decreasing the pressure inside the
compartment. The commonly used small hole in the middle
of the bulkhead (like we recommend to relieve pressure build up due to altitude
and temperature changes) would not be big enough to allow enough air to pass
with each squeeze to prevent these pressure changes. He further realized that this
could be another reason why rough water paddling often makes small holes leak
more; the water is being "sucked" into the compartment during the
decreased pressure phase after some air had been squeezed out during the
increased pressure phase. 5. To remove the water that is behind a bulkhead the
hatch must usually be opened to allow pumping or bailing. The catch is that in
rough water this open hatch may let in water much quicker than you can get it
back out. “Hey, hang on,” Mike shouted into the wind. “Check out my boat.” Paul slowed and let Mike pass. “The stern of your boat looks like it’s submerged quite a bit,” he said. Paul drew his boat over to Mike’s, held on to the deck rigging and pried open the back hatch cover. He peered inside. “It’s half full of water!” Just then, a large wave crashed over the two boats and nearly filled Mike’s back hatch completely. The pair were unable to place even a partially inflated float bag into the flooded compartment in an effort to displace the water. After several boat-over-boat T-rescues to clear the continually flooding compartment (that left the victim in the cold water again each time) the otherwise well prepared kayak instructors called the Coast Guard for rescue after the flooded compartment destabilized the kayak again and a resulting capsize left the already cold victim in the water once again. Several years ago I was paddling a gear laden rental kayak in Baja that had a leaky front hatch (and/or hatch mounting seal) and was flooding in once we got into rough seas. There was no front bulkhead in this kayak so the leak was quickly obvious. I had to stop repeatedly to pump it out through the spraydeck during the five mile crossing. Even though I told my paddling partners of my problem when I first experienced it I apparently didn't get across to them the potential seriousness of the situation. They kept getting way ahead of me (because of all my pumping rather than paddling) and they were not looking back behind them much, essentially leaving me alone to deal with the problem. If you or a partner has a leak make sure everybody understands the potential gravity of the situation and insist they slow down and follow behind the leaking boat so they can keep an eye on it and be close at hand to help if necessary. In rough water it is harder than normal to look back and easy to get too far ahead of a slower (or somehow impaired) paddler. When paddling solo it would be difficult if not impossible to remove water from closed compartments that are flooding due to poorly sealed hatch covers, seams, or some other breach in the hull or deck. Over several hours even a relatively small leak can create a dangerous situation, especially for a solo paddler. To compound the problem it is difficult with bulkheads to even know a compartment has a leak until you reach shore and open the hatch or your kayak becomes seriously out of trim or is handling poorly due to the flooding. Without bulkheads leaks show up quickly in the cockpit area so you will notice the water before it gets very deep. During Paul Caffyn's circumnavigation of New Zealand's south island described in his book Obscured by Waves (out of print) a leaking stern hatch plagued him more than once. On one occasion he crash landed through huge surf because his stern had sunk until he was up to his armpits. Fortunately, the extreme stern heavy trim helped him get through the big surf without pitchpoling. On another occasion a wave "popped" Paul’s spraydeck open leaving his cockpit swamped. He capsized in the now unstable kayak and then accidentally dislodged his rear hatch cover after wet exiting. He reentered his kayak. Eskimo rolled and managed to paddle to shore while sunk up to his neck. The kayak had only its bow protruding above the waves. In his book Paddle to the Arctic Don Starkell describes his race to make it to shore in Hudson Bay before his slowly sinking stern made his kayak unmanageable. He had some early clues he was sinking but as the process was gradual it took quite awhile to confirm it. I called him to ask for more details. He told me that while the hatch had tested watertight back home a sled he had tied to the rear deck was buckling the plastic hatch lid leaving a gap at the sides (between fasteners) exposed to the waves. 6. Foam bulkheads have the same advantages and disadvantages as fiberglass bulkheads
except that the stress riser problem may be slightly less (depending on the thickness and
flexibility of the material used) and the glue is probably not as reliable as fiberglass
in sealing and holding the bulkhead in place. (Note: One advantage sometimes claimed for a
foam bulkhead is probably wishful thinking. Gouging a hole in a foam bulkhead--as has been
suggested by some--is unlikely to allow a solo paddler to drain the water out of a flooded
stern compartment and into the cockpit area. By the time you realize there is a leak, the
kayak will probably be trimmed with the stern down. The water isn't going to flow uphill
to where you can reach it. It is more likely that new water coming into the cockpit (which
probably had the sprayskirt opened in order to gouge the hole in the bulkhead) would flow
downhill, through the new hole in the bulk head and into the stern compartment. Gouging a
hole would probably mean more water in both the cockpit and the stern compartment making
matters worse rather than better. 7. A hatch cover on the foredeck that is not reasonably flush with the deck may turn a wave coming over the bow into spray, giving you a series of cold salt water showers in head seas. Note: My design criterion for a perfect bow hatch is that it must: 1) be totally watertight, 2) not spray water into one's face when a wave rushes over the foredeck, 3) take up little or no storage room inside the kayak, 4) be large and long enough to easily load gear through, 5) be deep enough so longer objects and bags can turn the corner and fit, 6) be durable and secure against failure or inadvertent removal at sea, and 7) be effortless to open and close. Then just when I thought I had come up with a design that might fit my criteria my brother added number 8) it had to look good. If you can come up with a design that is watertight and does even three or four of the other seven I (and a lot of other kayak designers) would be interested. While you're inventing it could you also make this new bow hatch retrofit to existing kayaks. There is a great small business opportunity here!Leaks Some hatches leak at the gasket seals. Others leak where the hatch base is attached to the hull. Many kayaks take on considerable amounts of water through their deck to hull seams (usually these leakers have vinyl extrusion seams that are glassed only on the inside and also create a gutter to hold water and direct it to where the leak is). I have also seen leaks where parts of the rudder, rudder cable guides (bare cable out a 1/4" hole in one case), or grabloops penetrate the hull. Rudder cables can pump small amounts of water into the cockpit through the cable guides. I've found leaks coming in through gaps where the coaming attaches to the deck. I've seen fiberglass bulkheads that were more like a sieve and others that leaked around the edges. Many foam bulkheads leak around the edges. This is especially prevalent with polyethylene "plastic" kayaks since that material resists bonding with most adhesives. A little leakage into "watertight" compartments is so common I recommend you always back up your bulkheads and hatches with "waterproof" bags around any of your gear you don't want getting wet. Judicious use of adhesive caulk or silicone sealer can fix many of the point leaks or reseal around a foam or fiberglass bulkhead in a fiberglass kayak. Thickened resin or another layer of fiberglass can fix a sieve like bulkhead. Do not lift a kayak with stern gear load from the back of the cockpit. Lifting here can put considerable strain on the rear bulkhead adhesive. (Similarly don't lift fiberglass kayaks by the edge of the cockpit rim especially when there is gear in them because this puts considerable force on the rim to deck joint. If you crack this joint you create another leak.) Once when I was leading a day trip the wind speed increased considerably in the afternoon. During the return trip after lunch, one relatively novice paddler began rapidly pulling ahead of the group. I became concerned and assigned another experienced paddler to keep the rest of the group together while I raced after the stray paddler to ask him to wait for the group. I caught up and asked what the rush was. He said: "I just want to get to the other side." Although he gave me no details he appeared very nervous and was not about to slow down. The rest of the group was in several good hands and doing fine so I stayed with the nervous speedster until we reached calmer water and some pilings under a long oil dock. At this point he leaned against a piling, opened his spraydeck and began bailing out the three to four inches of water (he had neglected to tell me about) with his coffee mug or teacup. Later inspection of the kayak revealed a vinyl extrusion type seam leak near the bow. He had taken on little or no water in the calm conditions before lunch but water flooded in as the bow was repeatedly punched into the waves on the return trip. In a mile or so there was three or four inches of water flooding the kayak. He was quickly aware that it was happening because there was no bow bulkhead. He should have reported the problem to me or someone instead of racing ahead alone. We could have helped stabilize and bail his kayak. Perhaps he was embarrassed to be sinking in his brand new kayak and hoped to make it to the other side without anyone realizing it. The easiest way to test a kayak for a leak like this is to stand the kayak on end and fill the end three or four feet deep with water. Take careful note where any water is leaking out. If a kayak leaks at the ends suspect a leak where a grabloop hole or rudder pin penetrates the hull. In fiberglass kayaks this can be due to a crack or void in the end pour or end plug. Pouring a little more end pour material (resin, catalyst, and some filler) into the end should fix this kind of leak. Is water coming out through the seams? Leaks along the seam are usually occurring a little above where you first see the water coming out. Seam leaks can be very difficult to fix. I've talked to people who have returned their kayaks to the manufacturer several times because of severe seam leaks before giving up on the kayak in frustration. My experience is that it is easier to fix leaks in seams by caulking the outside than by working with thickened resin from the inside (the most commonly attempted fix). Before you blame your hatches for the water that is getting into your "watertight" compartments test for these other leaks. Hatches often leak a little and most likely not much can be done to improve the situation (other than a different hatch design or another kayak that you tested before buying). Gaskets or seals made of rubber foam can become compressed or get stretched out with constant use. To protect the rubber seal's rebound for as long as possible the prudent paddler removes the hatch lids (or showercap type seals) when the kayak is not being used. Storing the kayak with the hatches open also allows the interior of the compartment to dry, making small leaks more obvious the next time you use (or test) the kayak and preventing mildew from growing. With a new kayak this also helps remove the styrene degassing from the laminate and/or seams. The styrene smell can build up and contaminate food stored in a closed hatch. A hatch/bulkhead system does not obviate the need to keep critical gear (like your sleeping bag) and gear that water might damage in watertight bags. Even if the compartments are watertight enough to not compromise your flotation, few are totally watertight and even those compartments that are watertight now could become damaged during use. Backing up your hatch and bulkhead system with floatbags and/or watertight gear bags in the compartments is an excellent idea (though not widely practiced). The Sea Sock and Pod
Advantages: 2. No stress-risers (bulkheads) are added to the hull. 3. Large, potentially leaky, hatches are not required because gear can be loaded through the cockpit before installing the sea sock. 4. It keeps the kayak cleaner inside. If you've tracked mud or sand into the cockpit just let the nylon sea sock dry after the trip and then shake out the dust. Disadvantages (sea sock only): 2. Any water that leaks into the hull behind the sea sock is difficult to remove using a hand pump without opening the sea sock. (A built-in pump or electric pump could allow you to pump out water from hull leaks without opening the sea sock.) A hand pump and paddle float should probably not be stored where the sock would need to be opened to get to them. 3. A sea sock should be backed up with float bags and/or waterproof gear bags because you might open the sea sock while paddling in order to get to your lunch or other items. A capsize at that time could be disastrous if the sea sock wasn't quickly closed again and you didn't have back-up flotation. Any gear you want to get at easily while paddling should be stored in the sock or on deck. 4. The nylon fabric between your thighs and your kayak's knee braces can make it more difficult to get a good grip under the cockpit if your kayak's thigh braces are not at a steep enough angle for you to hook your knees securely under the deck (rather than just depending on friction in that area for a grip). I sprayed some contact cement in the thigh grip area of one of my sea socks so the nylon skin of the Farmer Johns I sometimes wear to surf could not slip as easily against the nylon sock as before. The nylon fabric of the sea sock will also be between the coaming rim and the spray deck that goes over it, possibly reducing friction there and allowing the spray deck to (unintentionally) release more easily under strain, such as when a breaking wave lands on it. You may need to tighten your spraydeck's shock cord some to prevent this. Check this by pressing the spraydeck down hard with your hand in front of you in the middle of the cockpit while you are seated in the cockpit. 5. There may be some chance of tangling with the sea sock during a wet exit. Although I never personally experienced this during numerous "wet exits" in the surf with sea socks, I have heard rumors of it happening. The most likely scenario I can imagine is someone attempting to exit the kayak too quickly (before being fully upside down) and getting twisted around inside the cockpit. In this scenario the paddler's feet would have to twist the seasock around them. To minimize this possibility always burp as much of the air out from behind the sock as you can before sealing the last of it to the sides of the cockpit rim. A rigid piece of foam cut to fit inside the kayak and fitted into the foot of the sea sock can hold the seasock away from your feet. The foam becomes your footrest and the kayak's footpedals hold it from moving forward. Some paddlers have sewn Velcro patches to the outside top of the sea sock and glued the other half of the Velcro to the underside of their kayak's deck in order to hold the seasock up off their legs (and/or to prevent it twisting). 6. Sea socks can slightly increase the temperature inside your cockpit on a hot day. (Note: This could be seen as an advantage in cold weather). The addition of a Sea Sock to either flotation system will limit the residual water to the point where pumping immediately may not be necessary. We consider Sea Socks an essential safety device for double kayaks. Doubles (especially ones with no center flotation) can easily swamp to the extent that the smallest of waves are lapping over the cockpit rims. Even with spraydecks in place and both paddlers frantically pumping it can take twenty or more minutes to pump out the water in a typical double with bulkheads only in the ends. With Sea Socks enhancing the buoyancy the process of righting the kayak dumps out most of the water. Note: Don't lay over the top of a kayak to right it (unless that is the only way to succeed at righting it). Although reaching over the kayak is suggested in one text, your weight pushing the kayak down means the cockpit scoops up considerable extra water as the kayak is righted. The extra water will further destabilize the kayak and more pumping will be required. The Pod Advantages: 2. Can also add structural strength to the hull in the cockpit area. 3. Less likely to entangle a paddler's feet during an exit than a seasock Disadvantages: 2. Makes the kayak much heavier 3. Water that has gotten inside the hatched area can often shift freely back and forth between bow and stern with this system. The result is that without additional float bags or gear bags, whichever end of the capsized kayak you hold your weight over will more easily sink. The victim is left trying to perform a balancing act near the middle of the kayak and will therefore find it difficult to lay up out of the cold water on top of the overturned kayak. Unless there is a sealed bulkhead in the middle (or float bags or gear bags are added to each end) sit-on-top kayaks can also suffer this end to end water shifting problem. Backing up your flotation system Often a kayak may have a bulkhead and hatch system in one end and a float or gear bag system in the other. Usually the bulkhead and hatch are in the back where the hatch can be larger and is more protected from forced water entry due to waves (by the paddlers body when traveling forward). This combination also minimizes the spray coming into your face because of a protruding bow hatch. To back up this mixed system you would need a floatbag (or gear bag) to back up the hatch in the back and a seasock to back up the float bag in front. A naive kayaker may believe a kayak using a mixed system has all the flotation needed already in place in the form of the stern bulkhead and not realize that a capsize will mean his kayak will quickly resemble a buoy with the bow facing straight down. If you are going on a day paddle it would be prudent to check on the flotation used by each of the other kayakers on the trip. A prudent trip leader always does this since one kayak sinking (or half sinking) is extremely difficult to rescue could put the entire group at risk in the attempt. Analyze in what ways the flotation system you have been putting your faith in is vulnerable. Testing and analysis should help minimize your risk in a situation where your kayak's flotation will be crucial to your survival. Which system is best? Like feathered vs. unfeathered paddles and rudders vs. no rudders the question "what flotation method is best" can generate many hours of heated discussions. It is incumbent upon each of us to make our choices and live (or die) with them. What is most important is that you understand the need for maximum flotation and understand the weaknesses of your chosen system. Reading an article can only give you suggestions about where to look for problems. Finding problems with your system is best done by actually testing your kayak. While you are testing it also check out what happens if your flotation fails. It can be a very eye opening experience to see what a predicament you will be in if one end of your kayak accidentally sinks. Maybe the following stories will be enlightening. These following stories all concern the same model kayak (original Sea Otters--not the later Sea Otter 500 series). The original Sea Otter had a stern bulkhead and a rear hatch that was often not firmly fastened in place. The bow was open and tapered quickly forward from the widely spaced foot pedals. Even fairly large gear bags or floatbags that would fit into the tapered bow could easily slide past the foot pedals if not secured in the bow in some other way. The incidents are recalled as examples of flotation failure with either hatch/bulkhead or floatbag/gearbag systems. While the hatches on later Sea Otters have been made more secure I still often see hatches on older model kayaks, kayak kits, and home designed kayaks that are very insecure. Unfortunately they are still being used without appropriate back-ups. The paddlers are often unaware of how vulnerable their kayaks are to sinking should they capsize. From the Fall 1986 (Vol. 3 #2) issue of Sea Kayaker (or Sea Kayaker Deep Trouble chapter 6): "As he tried to climb in over the bow, a considerable amount of water poured into the cockpit, dislodging a loosely filled gear bag, which floated up and out. He had no sooner grabbed that than the bow flotation bag came out as well: it blew away in the wind. Knowing the bow would sink without flotation, he stuffed the gearbag back into it as far forward as he could. He then decided to reenter the kayak from the stern so he wouldn't be tipping the bow down, risking losing the gear bag which was now all the flotation there was in the bow. At the stern a bulkhead and hatch were providing flotation. He climbed back up onto the rear deck from the stern and tried to maintain his balance as he pulled himself forward towards the cockpit. A big wave knocked him off the deck and as this happened he somehow accidentally popped the hooks on the hatch bungee cords loose from their eyelets. At the same time the snap down rear hatch cover came loose. He managed to hang on to the hatch cover and get it back in place. As he was again trying to climb up over the stern a large wave crested and broke down on top of him, knocking the hatch free again. With only a five-gallon bucket for flotation to back up the hatch the rear compartment began to take on water. The bow gearbag again floated out of the cockpit, and the bucket floated out of the rear hatch opening. Within seconds the bow had sunk and Bob's confidence with it." Robert, a novice kayaker on the same trip, was having his own problems. "When his head broke the surface he saw several items from inside his cockpit floating around him: the seat, his paddle, two gear bags from the bow, and an empty plastic jug. He righted the kayak and began putting these loose items back in the cockpit but they kept getting out again and he was having trouble repeatedly retrieving them all. (He comments that this must have looked something like an old time comedy film.) Like Bob, Robert soon realized that he had to make a choice; he let the seat and jugs go, but managed to save the paddle and gear bags. He shoved the gearbags as deeply into the bow as he could and tried to bail the boat out with the plastic container which had been tied into it for that purpose. With the waves breaking over the kayak he soon realized that bailing was futile." Robert made it to the beach paddling backwards with the waves crashing into his chest and with his feet hanging outside the cockpit for stability. He capsized and reentered about a dozen times. Bob (Robert's friend with the vertical kayak) was rescued after others on the trip called for outside help. He passed out several times during the rescue. His core temperature was 88 degrees Fahrenheit. He was having hypothermic convulsions and was treated for hypothermia in a hospital. I once rescued a paddler from the surf during the annual winter Surf Frolic at Lapush, WA. I paddled to shore with him riding prone on the back deck of the Coaster prototype I was testing. He had come out of his kayak and the rip was moving him and his kayak rapidly along the beach towards the jetty. Several paddlers were trying to get his kayak pushed to shore before it got into the seaward rip next to the jetty. They did not succeed. The current took the swamped kayak quickly out to sea into some bigger breakers. The next time I saw it, it was vertical (with the bow up) and was being hit by breakers. We had considered going out the river to pick it up outside the breakers but on seeing it in the big surf we decided to wait. We figured we could pick it up on the next go round (of the circular, river driven, eddy that had just taken it out past the jetty). All that came around to rescue was the kayak's bow section (from the footbraces forward). Wedged tightly into the bow was an inadequately small float bag that could have easily slipped past the foot pedals but in this case didn't. The float bag was in tight enough that even the surf could not dislodge it. The cockpit and stern section were never seen again, we can never know for sure how the buoyancy in the stern failed but I suspect the hatch leaked enough (or was dislodged by breakers) to sink the stern creating a heavy vertical buoy for the surf to break in two. The point of these last stories is that almost any flotation system is subject to failure under the right set of circumstances. Two systems backing each other up are much more likely to survive conditions that might destroy either one alone. REMOVING WATER FROM A SWAMPED KAYAK
The following paragraph could be an
advantage of bulkheads--for some kayaks--that is if the bow also contained little or no
gear weight. Once again for emphasis, the main purpose of any flotation system is to facilitate rescue. With either bulkheads or float bags the amount of water remaining in the boat after a dump and reentry will have such a deleterious effect on the stability and handling of the kayak that it must usually be pumped out before proceeding. Whichever system you use, test and become familiar with it so you understand its limitations and vulnerabilities. Monitor it regularly and fix defects as soon as possible. Test your flotation system and rescue techniques soon. ©copyright
1996, 1998, & 2011 |