KAYAK RESCUES
THAT WORK There are a
variety of group rescues described in kayaking texts, such as the X, TX, H, and HI. These
begin with emptying the water out of the overturned kayak by lifting and rocking it over
the deck or paddles (held across the decks) of the upright kayaks. The rescuers then help
the victim back into the kayak. Rescues of this type will usually work if conditions are
sufficiently calm, the decks and/or paddles are very stiff and strong, the rescuers are
strong, and the victim's kayak has no significant gear load. In actual field conditions
the kayaks may be carrying 100 to 200 pounds of gear, and lifting one over another becomes
very difficult if not impossible even in calm weather. Imagine trying this in 40 knot
winds and steep cresting waves. If you don't carry a pump or other bailing device these
may be all that are left for you so it might be wise to learn them, but take care not to
damage your kayaks while practicing. Always carry a pump and back it up with a container
you can use to scoop water out of your cockpit if your pump fails. A three quart freezer
container or wide mouthed poly bottle works well, and doubles as a lunch box.
The use of a pump or bailing device along with some method of limiting
the amount of water that can get into the kayak have proven much easier, and have replaced
the "letter" rescues in those texts that have gone beyond simply restating old
manuals. The limitation on these modern group rescues is seas rough enough (breaking seas)
to make steadying a kayak while the victim reenters (or is helped to reenter) a dangerous
undertaking because of kayaks crashing into each other and the victim.
One rescue often presented in old (and British Canoe Union influenced) texts and
parroted in some new ones is known as the "All-in-Rescue". Three victims who
have all been capsized by the same "event" help each other get into their kayaks
one at a time. I consider this little more than a pool exercise with very little value in
the real world. The biggest problem outside the pool is going to be how do these three
capsize victims get together in the extreme conditions that capsized them in the first
place to even start the rescue unless one can do a self rescue and then paddle to the
others in turn. But why not have each work on his own self-rescue instead of waiting
around (or swimming to get together which brings on hypothermia even faster). The first to
regain the use of his kayak then paddles over help the others if still necessary.
What happens if you find yourself alone, or with paddlers who don't know how
to help, and you capsize? Here are the rescues that we consider the best. The first three
are solo rescues that can be done in extreme conditions (at least by experts at performing
them). The others are two person rescues which have the advantage of being quick and not
requiring three kayaks to get together (or try to keep apart) in difficult wind and wave
conditions. Each of them could have a potential advantage in certain situations. We
suggest you practice them all.
- ESKIMO ROLL
- MARINER SELF RESCUE (Outrigger Paddle Float
Rescue)
- RE-ENTER AND ESKIMO ROLL (and Paddle Float Roll)
- ESKIMO RESCUES
- ASSISTED RESCUES (Side Rescue & Laid Back
Rescue)
THE ESKIMO ROLL
Every serious kayaker should learn the
Eskimo Roll. It is by far the quickest, most reliable method of rescue. With a stroke of
the paddle and a flick of the hips the paddler is back upright and ready to paddle on. Its
only disadvantage is that some find it difficult to learn. Many kayak clubs and dealers
rent time in heated pools and teach Eskimo rolls on an informal or formal basis. Sea
kayakers should take advantage of these classes. Since we know only a few who learned to
roll from a book (usually with the aid of a face mask and snorkel) we suggest you take a
class. We describe the procedures here only to pass along some tips that might be of
benefit in the learning process, but this might also enable those with extraordinary
desire and abilities to teach themselves the knack without benefit of instruction.
A helper standing in about three feet of water can help right the kayak when
you fail by twisting the kayak or lifting you by the arms. If the bottom is firm and your
paddle is strong you can also pole yourself upright. Either way, you won't have to
"wet exit", dump out the water, and get back in the kayak following each
unsuccessful attempt. You must fit firmly in your cockpit (at least while learning). There
should be good knee or thigh grips and the footbraces should be adjusted tighter than you
would normally use. Most important, your hips must be firmly supported so there is little
or no side to side motion. Unless your sea kayak is a relatively narrow one with a tight
seat and good knee braces you may find it easier to learn to Eskimo roll in a slalom kayak
(because they usually have a firmer fit and a lower back deck).
If your sea kayak lacks knee or foot braces consider installing them.
Wedges of closed cell foam contact cemented under the coaming rim can often make
satisfactory knee grips. Nose plugs and goggles or a face mask make the time spent
underwater more comfortable and make it easier to watch what you are doing. A float
attached to one end of the paddle can make learning to roll easier. It might even help
those in an area where instruction is not available to learn to roll on their own, if they
are especially determined and well coordinated. The paddle float allows you to go through
the procedure in slow motion, building neural pathways that will help guide the motions
when the float is removed. It also allows you to hold an intermediate position and analyze
what must happen next in order to make the roll as effortless as possible. By gradually
decreasing the amount of flotation you might be able to work up to a roll using only the
paddle. A board of Ethafoam™ (or some other similar closed cell foam such as a belly
board often found at swimming pools) one to two inches thick works best. Cut it wider than
your paddle blade (tapering the edges for streamlining) and securely hold it in place
(tape it, strap it, or cut a pocket into it so it slips over the blade). CAUTION: The use
of flotation makes it easy to get in the bad habit of "muscling up" so take care
to right the KAYAK FIRST and removing your HEAD from the water LAST. Inflatable paddle
floats (described later with self rescues) will also work but take care not to damage them
on the pool sides. Also, unless the flotation has a relatively thin flat cross section it
will seriously retard the sweep stage of the roll (which should be done very rapidly).
ESKIMO ROLLS
We have found the Pawlata roll to be
the easiest to learn as well as the most reliable, due to the increased leverage provided
by the extended paddle. Once you have mastered the Pawlata you should progress beyond it
to the closely related screw roll. The screw roll is quicker because it requires no change
of hand position to set up. Also when you finish the screw roll you are prepared to
immediately make a necessary brace without having to re-adjust your hand position. After
one type of roll is mastered the rest are easier to learn, therefore attempt the easiest
one first. There are numerous varieties beyond those described here. Some rolls start with
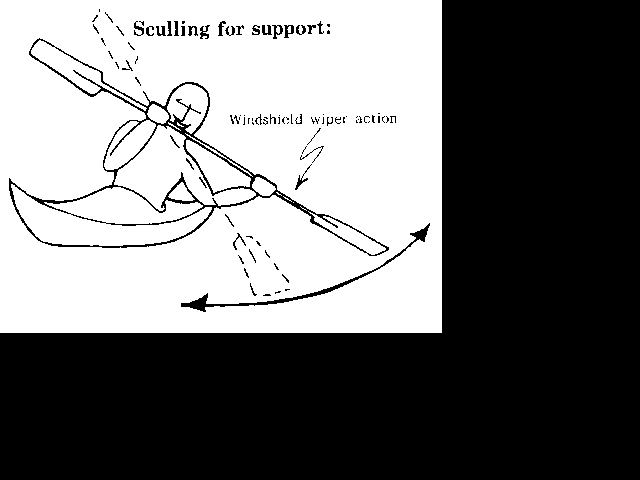
the paddle blade to the rear and sweep forward. Some use a back and forth sculling motion
and still others don’t use a paddle at all. You should attempt to learn several--it
will help work out the roll that works best for you, the one you'll try first when it
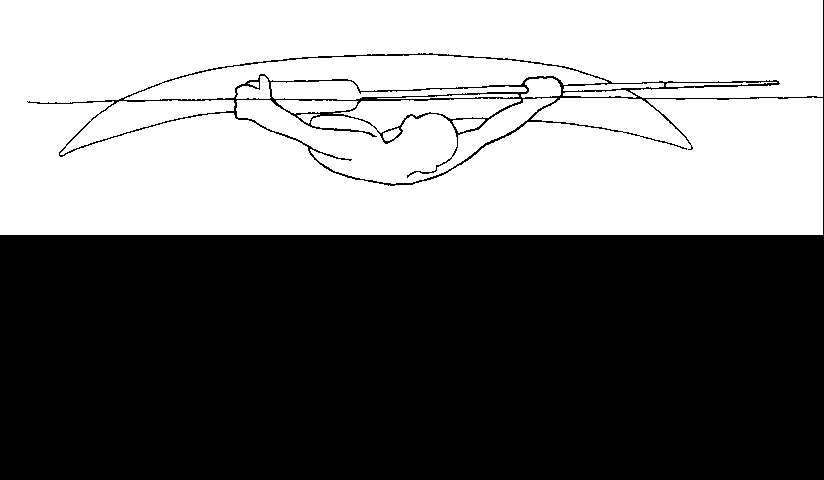
really counts. Before you attempt to roll you should practice bracing strokes until you
can lower your ear in the water and right yourself again with a strong brace or by
sculling. Because this brace is similar to the final part of the Eskimo roll the tips on
finishing the roll apply here as well. Bracing is a good skill to practice for its own
sake, but it also serves as a way to learn much of the Eskimo roll without the confusion
of being upside down underwater. If you don't seem to be making progress don't continue to
practice failure, but go back to the preliminary exercises that seems the most relevant.
SET UP: in position to begin the Pawlatta roll
Learning the Pawlata Roll
Grip the back of the rear blade
(as shown) with the knuckles to the outside. The other hand grips the shaft near the
middle and palm down. I have found it easiest to teach if the student starts from the
finishing position and then practices just the finishing parts first. The finish position
is lying across the back deck while looking up at the ceiling (head back--maybe even
resting on the deck) with the float end of the paddle in the water farther toward the
stern than your head. Move the paddle more towards 90 degrees while you lower your head
into the water on the paddle float side. Reverse the motion you just did and bring
yourself back to the starting position. It is as though you wind up before taking a swing
in baseball or golf. This way you practice the path you will be taking at the finish by
winding up to get into position to start. As the finish becomes second nature move the
wind-up farther and farther forward with each successful finish until you reach the
starting position for this roll which is: Holding the paddle alongside the kayak parallel
to the water surface while keeping both arms straight at the elbow. Both wrists are bent
to keep the forward blade flat to the surface of the water. While leaning forward at the
waist with your head almost touching the fore deck, check that your blade is at the
surface and flat to it (by pushing it into the air and slapping it down on the water or by
watching it if you are wearing a mask or goggles). The rear hand is held next to the kayak
while the other wrist leads the limp wrist, hand and shaft in a sweep directly to the
side. The sweep is accomplished by rotating your shoulders even further in the direction
that your body is already twisted and at the same time lifting the forward arm from the
shoulder. A very slight downward pull during the first 90 degrees of the sweep brings your
body parallel to the surface and the kayak to about halfway upright (caution--a common
error is to pull strongly down too soon). The biceps of your forward arm should be wiping
across your face and sort of pushing your head back in an arc towards the finish position
on the rear deck. Keep both arms straight at the elbow until the paddle has sliced out to
around 90 degrees from the kayak. At this point in the continuing sweep pull strongly down
with the forward arm while pushing up with the rear arm (still holding that elbow
straight). At the same time bend sharply at the waist trying to touch your hip to your
elbow in order to get the kayak upright before your head is clear of the water. It is
often easier to think of this "hip flick" as a hard pull against the kneebrace
with the knee on the side on which you are pulling the paddle blade (and float) down. You
should end up with your back arched over the rear deck and looking up at the ceiling. Your
paddle has gone through nearly a 180` sweep and the blade is now pointed well back of
center. Done correctly this is effortless and requires only the sweep and not a hard lift.
With a float on the paddle you can do this in slow motion so you have time to think about
your next move in the sequence and groove in those neural pathways. Once you have that
down so it is very easy try speeding up the motion (you will now definitely need a flat
float) until you can do the roll very quickly. You will need to do the roll quicker when
you take the float off the paddle so you can use the "lift" of your gliding
paddle blade as your support instead of the float.
Hints:
Many texts advise that you angle your
paddle blade up to prevent it from diving. Many beginners overdo this. Angling it up to
skim along the surface only causes it to stall, which slows down the sweep, resulting in
the paddle blade being too deep in the water by the time it reaches the position where it
is to be pulled powerfully down and in towards your hip. When the paddle stalls most
learners also pull it downward much to soon. (The paddle should move to nearly
perpendicular where one has a much better lever arm before strongly pulling it down.) Your
blade should start out flat on the surface. The sweep must have the blade slicing
horizontally, "gliding" in the water in a wide arc (as far from your body as you
can stretch). A slight downward pull happens automatically as you sweep out and this keeps
the level blade on a glide angle. This slight lift (and reaching way out with the sweeping
blade in a relaxed stretch) rotates your body out to one side just below the surface into
a position where it can be easily slid up onto the back deck after your knee pulls the
kayak upright.
When you begin the sweep if the blade slices rapidly but dives to the bottom
you can try raising the leading edge slightly on the next try but more importantly check
that you are not rotating the blade down during the early part of the sweep because your
wrist is tense. Holding the wrist rigid often causes the paddle blade to dive. To prevent
this practice leading with your forearm while hooking the paddle with only your fingers
(so as not to twist the "gliding" paddle downward as your arm pivots). Keep your
wrist limp so it acts like a rope that is pulling the paddle shaft and gliding the blade.
Experiment until you find the angle where the blade slices the fastest but does not dive
(done correctly the blade will be a foot or two underwater when you start to lever your
body out of the water).
Until you find the blade’s glide angle all attempts to complete a roll
will fail and you may pick up several habits that might need to be laboriously broken
before you will be able to succeed. Work at learning one part at a time but be careful
that your practice is as close to the actual motion as possible. You don't want to be
ingraining a habit that will cause you trouble later. For example, the hip motion to right
the kayak before lifting the body out of the water is often taught by having one capsize
and grab the pool edge, the instructors' hands, or a pool float. The support allows one to
pull (with the hips) the kayak under oneself before the head is lifted out of the water.
The problem is that if you use both hands you will lift your face out of the water last,
but you really want to end this roll lying on the back deck and therefore should be
practicing lifting the back of your head out of the water last. The latter can be
practiced if you use only one hand on the support as you finish, but I prefer using a
float on the paddle for support rather than your hands because it more closely mimics the
actual motions and arm positions you need to learn.
You want to come out of the water lying back because you will not need to
lift your body as high to bring the kayak under it. Lying back also lowers your center of
gravity making the kayak more stable which may result in a successful roll even though you
didn't get yourself completely upright.
Most learners try to muscle themselves up to the surface and try to get their
head out of the water as soon as possible. That is exactly the opposite of what you must
do. You need to be stretching and reaching out with your body and arms rather than pulling
in towards your center with your muscles as those trying to muscle up do. Also, you must
leave your head in the water (which will support most of its weight) as long as possible
until you can slide it up on to the rear deck.
The Screw Roll and beyond
A screw roll is virtually the same as
the Pawlata. The only real difference is that in this one your hands never alter their
normal grip on the paddle. One result is that set-up and recovery is quicker. For many
experts the screw roll just another stroke and they often don't even have to get set to
roll. They can begin one from whatever position they happen to find themselves. Once you
master the Eskimo roll make sure you can do it with the equipment you will actually be
using. When you get a new boat, paddle, PFD, drysuit or anything else that might affect
your roll you should practice rolling with it. It's not enough to be a pool roller, you
must also be capable of rolling the kayak as you would be paddling it. That is with a gear
load, bag on the back deck, your life jacket on, etc. You need to be successful in
whatever conditions (cold water, waves, turbulence, etc.) you may find yourself.
When you've practiced this enough you'll find you can slowly lean your
body over until your ear is in the water, then slowly bring yourself back upright. If done
quickly you can manage it all with a single sweep. Work on your bracing strokes and you
may never have to resort to an Eskimo roll.
Consistent success in your practice
pool in no way guarantees success under fire. For example, before I ever went down a river
I had learned to screw roll with about a 99% success rate in a pool. My first four
attempts to roll in the river failed (mostly due to the turbulence of the water--which is
what capsized me--grabbing at the rear blade making it difficult to hold it in the set up
position). By the next time I capsized I had also learned the Pawlata, which provided much
better control over the rear blade (you grip it with your hand and hold it flat against
the kayak side where the turbulence can’t pry it away). That started a long string of
successful rolls under fire using the Pawlata. I have since compromised and use an
extended paddle screw roll where my rear hand grips the shaft at the junction of the shaft
and blade. This still gives good control of the blade in turbulence and allows me to
easily feel the blade angle as with the Pawlata. It also provides more leverage than the
screw roll. Once upright it still requires that I move my hand back into paddling
position, however I don't have to remove that hand from the shaft to do so as with the
Pawlata. The extended screw roll is a small intermediate step to take when starting to
learn the screw roll after having mastered the Pawlata. I still use it when I absolutely
have to make the roll and don’t want to take any chances with second best (for me
anyway).
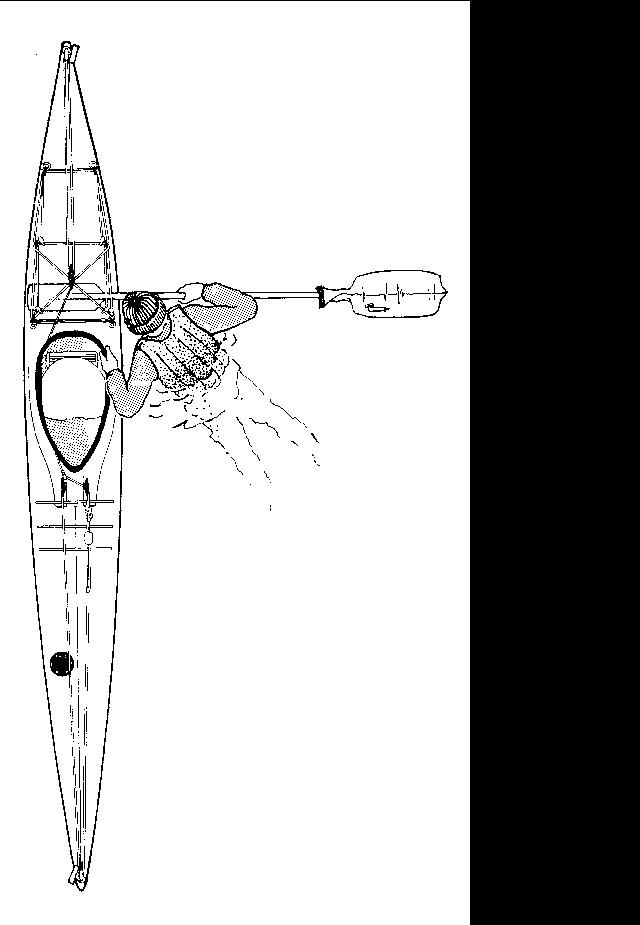
THE MARINER SELF RESCUE
(and other Outrigger and Paddle Float Rescues)
The Mariner Self Rescue was developed
for use with the Mariner Sea Kayak but it will work with most other sea kayaks as well
with a few minor additions to the kayak or a slight modification of the technique. Several
refinements have been made since we first presented it in our user's manual back in 1981.
They are included here. This rescue basically consists of attaching a float device to one
end of the paddle and then firmly attaching the other blade of the paddle to the back deck
of the kayak. Attach it in such a way that the kayak is stabilized, the paddle is
perpendicular to the kayak and it is kept from pivoting much either side to side or up and
down. Attached in this way the outrigger provides stability for climbing back in and just
as importantly during the pumping or bailing process that follows. This stability for the
pumping or bailing stage is its biggest advantage over the Reenter and Roll or Paddle
Float Roll rescues we describe later (it is also easier to learn and doesn’t require
putting your head and nose back under the cold water). The main disadvantage of all
outrigger paddle float rescues (including the Mariner Self Rescue) is that you need a way
to fasten the paddle to the kayak prepared in advance. Now that this rescue is widely
practiced, most U.S. manufacturers have developed (and include with the kayak) attachment
methods suitable to their kayaks. If you have no way to fasten the paddle to the deck
except by holding it, it can still work but it may be easier to re-enter the kayak and
Eskimo roll (assuming you can), using the paddle float as an aid if you need it. If you
use a method that doesn’t fasten the paddle to the kayak you are still going to be
faced with a very difficult time. Imagine attempting to keep a kayak full of water on an
even keel using one hand (and maybe shoulder) and sculling the paddle to stabilize the
kayak while you attempt to bail or pump out the water with the other hand. If you use your
paddle float to do a Re-enter and Roll (or an unfastened paddle float rescue) you can
stabilize the kayak a little better by holding your paddle across the cockpit. Push down
on the paddle shaft with your forearm as you lean slightly to the float side. This leaves
that hand free to hold the pump and the other hand free to do the pumping. It is still a
pain to get your spraydeck attached to prevent further water entry while holding the
paddle for stability Pumping or bailing can take five or ten tiring minutes even in good
conditions with a stabilized kayak. If your kayak isn’t set up to securely hold a
paddle in an outrigger position just behind the cockpit I strongly recommend you rig it so
it can.
The procedure for the Mariner Self Rescue is:
- Capsize and "wet exit" while never
losing your grip on the kayak and paddle. If your kayak blows away, leaving you far
from shore in cold water, your only chance will be to quickly summon help with a VHF
radio, cellular telephone, EPIRB, flares, distress flag, airhorn or other small signaling
device. Of course, that will have to be kept on your person and not left in your rapidly
disappearing kayak.
- Move to the downwind side of the kayak. This will
prevent the kayak drifting away from you and give your head and neck a little protection
from the wind. Try to minimize the water scooped in by pushing the near side of the
cockpit up and away from you when turning it upright. Make sure your kayak cannot get away
from you. If you can't turn it over this way, crawl over the hull, grab the coaming, and
pull it back toward you. This will scoop in more water to bail later so always try the
push up method first.
- Unclip or remove your float device from the
convenient and secure location where you stored it. At this point you should make sure a
tether line attached from the float to the kayak will prevent the float from getting away
from you if you "butterfingers" it. I prefer 3/16" shock cord four to five
feet long for this tether. It should have a clip to hold it to the kayak’s deck lines
to prevent its loss.
- Inflate the float about 90% full and attach it to
the blade in such a way it can’t slip free. Inflating the float tightly, a strap,
clip, buckle or even the stretched elastic tether to the kayak could all serve this float
securing purpose. Also make sure your secure attachment is easy to undo once you are back
in the kayak, pumped out and need to recover your paddle for its primary purpose. Note:
Foam type floats do not require inflation but you need about a 1/4 cubic foot of flotation
so they can be bulky to store in a kayak. It can be difficult to blow up an inflatable
float while hyperventilating after a sudden plunge into icy water so consider a foam float
or a wetsuit (or drysuit)--at least for under 60 degree Fahrenheit water conditions. If
the water is very cold steps 3 and 4 may be able to be performed before righting the kayak
so you can straddle it while it is still upside down. This traps more air in the kayak and
allows you to get more of your body out of the water while you are inflating and fastening
the float to the paddle.
- Slip the paddle under your gear or gear lines (or
attach it to your kayak however you've prearranged). This usually works best a little
behind the cockpit. The paddle blade should rest flat across the back deck or extend
beyond the far side of the kayak. If you are sliding the paddle blade under some decklines
from one side, it often helps to tilt the kayak some to get the best angle. It usually
works best with the blade tip--spooned side down-- just touching the deck so it can slide
easily under the lines to the drip ring. Next lift the deck line over to the other side of
the drip ring to help hold the paddle in place.
- From a position next to the cockpit (in front of
the paddle), grasp the near side of the cockpit rim with one hand and place your other
hand on the paddle shaft near the kayak.
- Swim your feet up to the surface and push
yourself out to arm's length while maintaining your grip on the cockpit rim and paddle
shaft.
- Pull yourself back towards the kayak and hunch
your shoulders and pull (and then push down) with your arms while scissor kicking your
legs until you’ve slid yourself up to a position where your belly is lying on top of
the paddle on the back deck. Take care that you don't go over the deck so far as to
unbalance the kayak to the unsupported side. As you pull yourself towards the kayak, take
care that you aren't pulling the paddle out from under the deck lines. A drip ring on the
paddle will help prevent this if you put it inside the nearest cord (the cord that is
holding the shaft down). Alternatively, you could slide the paddle farther under the lines
until the blade extends beyond the hull and then turn it 1/4 turn to "key" it in
place so it can’t be pulled back out until "unkeyed" by rotating it flat
again.
- While still belly down on the back deck, place
your nearest foot in the cockpit leaving your hand on the paddle shaft so that some of
your weight is always supported by the float (to insure you are not in danger of flipping
over to the unsupported side).
- Place the other foot in the cockpit and turn to
face toward the float. Switch hands while always keeping some of your weight on the paddle
shaft.
- Twist your lower body around while sliding
farther into the cockpit so you end up sitting in the seat. With my size twelve feet, I
have successfully tested this "screw yourself into the cockpit" entry method
with kayaks having cockpits as small as 19" by 15".
- Keep leaning towards the float side while you
pump or bail out the excess water. If necessary fasten your spray deck in place to prevent
more water from entering while you pump out the water. A hand pump can be slipped into
pumping position between your belly and the sprayskirt if necessary.
- Put on additional clothing if you are cold, and
it is available, while you are still stabilized by the outrigger float.
- Remove the paddle from its attachment (make sure
this is easy to do with your type of attachment). With a gear line or shock cord
attachment lift the cord to the other side of the drip ring--or "unkey" the
blade to free it--and then rock the kayak just enough to get your weight balanced over the
kayak rather than on the float. Next, rock the kayak slightly and pull the paddle straight
out from under the lines. Some floats can even be left in place on the paddle for short
paddling distances giving the capsize victim a solid brace on that side while regaining
whatever confidence they can muster.
Hints and Alternatives:
Try to keep your body lying against
the back deck until twisting to sit in the kayak. This keeps your windage and center of
gravity low so the wind and the waves won't affect you much.
If you can’t lift yourself up in a few attempts and you have started with your feet
on the surface as we advise, try putting your foot up on the paddle shaft to help.
Be careful not to put most of your weight on the middle of the paddle
shaft (especially directly over the joint of a two-piece paddle). Weaker, ultralight and
unlaminated wood shafts of paddles have been broken in this way. There is no need to put
much pressure on the paddle shaft to do this rescue but I mention this here because
getting your leg or knee up on to the paddle shaft and trying to lift yourself out of the
water with it is the most likely time a weak paddle might break.
In wind or waves, if you can’t get into the kayak from the
downwind side, pivot the kayak around and try it from the upwind side. Be careful that the
kayak does not get away from you because it might blow away faster than you can swim. In
waves "time" your entry when the kayak is in the trough of a wave and you are on
a wave.
Kayaks with especially high and/or peaked back decks often require other
methods. With these try crawling up from the back of the kayak and then pivoting around on
your belly using the outrigger paddle shaft to keep your legs up.
Another method for a high kayak requires a short loop of webbing or rope
(maybe the stern painter) hung from the cockpit rim or paddle shaft to provide a step next
to the kayak. The step (bottom of the loop) should be 6 to 10 inches underwater. If your
leg swings under the kayak when you step in the loop the loop is too long. A simple
overhand knot can shorten it. Your shin should press against the kayak as you step up. The
step allows a weakened or heavy paddler to use his or her leg strength to help them up on
a kayak with a higher deck. If you hang this step from the paddle you should use a strong
paddle and make sure the step is right next to the kayak to minimize the chances of
breaking your paddle.
Don't try to pump or bail the kayak from the water. It would be disheartening
to spend many minutes of hard pumping or bailing only to swamp the kayak again as you try
to re-enter. Also your goal should be to get as much of your body out of the cold water as
quickly as possible to prevent hypothermia. The exception would be if your kayak has so
little buoyancy (heaven forbid) that your weight will cause it to sink when you climb into
it. In this case you are in extreme danger and must carefully remove much of the water
that has entered (without letting one end of your kayak sink) and then climb back in
without taking on too much more water. If you are in this no flotation situation and there
are other paddlers around, get out of the water by climbing on their kayaks decks while
yours is being pumped. If you are alone, before you start pumping you should shoot off a
flare or attempt to make your predicament known by VHF radio, cell-phone or other locating
signal. If you wait too long to signal for help a rescue could come too late. Next add
whatever flotation you can, such as emptying your water containers or moving small gear
bags to where they will be the most effective. Pump or bail.
If your kayak has no flotation at all, or flotation in only one end, my tests
in a calm pool indicate that you may get one chance to do a very careful Mariner Self
Rescue. My tests indicate that "adequate flotation" is often a lot more than one
might think would be necessary. If you succeed in getting back in your kayak without it
sinking, seal your spray deck immediately and pump out through the front of the waist
hole.
Lost your paddle? This wouldn't happen if you had it tied to the kayak in
front of the cockpit with three or four feet of shock cord. The rescue works fine with the
paddle leash still in place--just slide the shock cord end tied to your paddle along the
shaft towards the kayak until it is out of your way). If your paddle is lost, use your
spare paddle to perform the rescue. No spare? You’re kidding! What would you paddle
with if you did get back upright? If you're lucky there will be other paddlers around that
aren't having as much difficulty as you are and they can retrieve your paddle, loan you a
spare, or loan you theirs for the rescue (or perform an assisted rescue) and then tow you
to safety.
Don't base your
planning and rescues on the presence of other paddlers you hope will be able to help you.
They may be having as much trouble as you!
When I first invented this rescue back in 1981 I looked around for a way to
support the outrigger and because it was handy took off my PFD and used it for a paddle
float. (Note: while it happens to be handy using a PFD is only a method of last
resort because removing your PFD means your head keeps going under the waves while you are
trying to fasten it to the paddle.) For the first few years after developing and promoting
this rescue we used a 2.5 gallon folding water container with cords and hooks we had
pre-attached to fasten it to the paddle shaft. A water jug is not quite as simple or easy
to use as the envelope style floats (described next), but is cheap and effective (with a
little practice) and can do double duty as a water container. The folding water jug could
be also be used partially filled with water to serve as a counterbalance to tipping the
kayak to the opposite side of the float (if one has not been careful to keep leaned
towards the floats side until disassembling the outrigger). I still use jugs rigged for
self rescue for my water containers on multi-day trips giving me a a back-up or two
to my primary envelope style rescue float.
There are now many kinds of paddle float devices, most designed with this or
very similar rescues in mind. The floats I like best are the inflated envelope that fits
over the paddle blade. They hold the paddle nearly level and can have a lot of buoyancy
while still being compact for storage. They inflate by mouth in about 30 seconds. The air
pressure usually holds them firmly in place on the paddle blade, but the best also have
alternative methods for securing them to the paddle. I carry an envelope style device of
my own design, the Mariner Rescue Float Plus, which has two air chambers. Each chamber has
enough flotation to easily perform this rescue should the other chamber become punctured.
Removing your Personal Flotation Device (PFD) is not a good
idea, but if you have no other paddle float or substitute available (such as a small
waterproof gear or camera bag) it may be all you have left to get yourself out of the cold
water. If a PFD can be tied to the paddle blade in such a way that it won't slip off (or
slide up the shaft) it could be used as a last resort. The waist strap or side straps on
the life-jacket or (with Mariner kayaks) the rear towline on the kayak could be used to
secure it to the paddle blade. It should be emphasized that this is a lot harder than
fastening a paddle float so won't work in as difficult conditions.
Note: The Mariner Self Rescue has sometimes been erroneously referred to as
the Paddle-wing. The Paddle-wing is a different (but also an outrigger) rescue that does
not use a float. It is a difficult rescue to execute even in calm water and was never
publicized widely. I first heard about it after sending out descriptions of our Mariner
Self Rescue to paddlers all over America. Unfortunately the confusion over the name has
sometimes lead to criticism of the Mariner Self Rescue (as we named it originally--or
Outrigger Paddle Float Rescue for those who prefer a more descriptive or generic name) due
to problems unique to the paddle-wing. This is especially so in texts written in England.
The Mariner Self Rescue has been shown to work in extreme conditions (by those who have
practiced it in those conditions). Don't expect a paddle float rescue to succeed unless
you have practiced in similar conditions. A paddle float is not a magic charm that
protects you automatically, you must practice. It is well worth the effort necessary to
set up your kayak to use it. It took many years but it has become the primary self-rescue
practiced in America and while it has developed many dialects and variations over the
years I haven’t seen a method that is superior to the one just described. I have
however, seen many classes, books, videos and national paddling organizations that
displayed far inferior variations with major areas of vulnerability not addressed.
Do not use shock cord to hold the paddle in place unless it is very husky or you double it
at each end (where the paddle blade first slips under). Shock cord does not hold a paddle
in the outrigger position as firmly as does rope or webbing (in whatever kind of
attachment you use). [Note: while far less common, too firm an attachment to the kayak may
increase the risk of breaking a weak paddle shaft.]
Some kayaks with high back decks (and sufficiently large cockpits) might
benefit by attaching the paddle in front of the cockpit and then straddling the cockpit
(like riding a horse) and dropping butt first into it. This position is more vulnerable
but then high back decks can be harder to climb onto to use the other method. If you find
that you can not get up on the back deck because it is just too high, try crawling forward
over the kayak from the stern. First you will need to set up the outrigger to stabilize
the kayak. Alternatively, fasten a loop of rope or webbing around the paddle shaft right
next to the kayak to make a step that hangs no more than one foot under water.
If the paddle is held in place by hand and not attached to the deck we call
it a Paddle Float Rescue (as opposed to an Outrigger Paddle Float Rescue in which the
paddle is firmly attached to the kayak). A Paddle Float Rescue will often work but doesn't
provide nearly the stability of the fastened outrigger. Keeping the paddle under control
side to side as well as stabilized can also be a problem especially in rough weather.
However, the major disadvantage of not having the paddle fastened to the kayak comes after
you have re-entered the swamped cockpit and need to get it pumped out but at the same time
all that "free" water is making the kayak very unstable.
You should still practice the Paddle Float Rescue for use in surf where a
fixed outrigger could cause a capsize or damage to the kayak or paddle (and it is unlikely
you will be pumping out the kayak anyway--instead just paddling and bracing--for shore).
Learning the unattached Paddle Float Rescue could also be of value if you find yourself
bailing out of a kayak lacking a way to attach the paddle to the deck.
REENTER AND ESKIMO ROLL
(And the Paddle Float Roll)
If you capsize and for some reason
fail to Eskimo roll (lost your paddle, gotten tangled up with something, or for some other
circumstance) you may want to get back into your kayak and try rolling again. However if
you failed the first time due to a reason that will still be a factor the next, don't
waste time, energy, and body heat in further attempts with small odds of success. Get
started on another rescue. If you have a paddle float you can fasten it to the end of the
paddle and use it to gain leverage to roll back up. The easiest way I've found is to place
your paddle blade across your upturned hull, climb into the cockpit, and pull up with both
hands on the paddle shaft between the kayak and float. This is almost identical to the
Eskimo Side Rescue described next except in the Side Rescue the rescuer's kayak takes the
place of the float. If you plan to reenter and roll, by whatever method, DO NOT right your
kayak just yet. Leave the kayak upside down so most of the water will be held out by the
air trapped in the kayak.
On re-entering your kayak your bodies volume will displace much of the water
that came in when you removed yourself from the kayak. You may be able to paddle off
immediately if the amount of water you have in the kayak is only an inch or two deep. Even
with a kayak nearly full of water you should always check to make sure you are not near a
dangerous location. If so carefully paddle the now tippier kayak to a safer place before
beginning to bail or pump.
ESKIMO RESCUES
Two types of Eskimo rescues are
described in many texts. The Eskimo Bow Rescue involves the capsized paddler remaining in
his boat and reaching above the water to pound his hands against the hull to attract
attention. Then he waves his arms back and forth alongside his kayak feeling for the bow
of his partners kayak to use to pull himself back upright. The partner must be very quick
and precise to maneuver the bow into position in time. As you may have guessed unless this
happens very quickly the modern capsize victim will give up waiting and wet exit. Since
the expert will try to roll until he runs out of air and the novice will most likely bail
out before the kayak has had a chance to get completely upside down this is not a rescue
likely to be used. Far more useful is the Eskimo Side Rescue, used after re-entering the
upside down kayak. The Eskimo Side Rescue can be used in the same manner as the bow rescue
and in most cases would be a little faster and also has the advantage of allowing the
rescuer to aid in lifting a weak or tired victim. However, since the victim is most likely
to already be in the water I'll describe the Re-enter and Eskimo Side Rescue. As with the
Re-enter and Roll do not right the overturned kayak. The rescue boat pulls up on the side
of the victim's kayak opposite from the victim. (Actually the victim can reenter from
either side, but make sure the kayaks are held apart so as not to pinch the victims head
if it's between them.) The rescuer lays his paddle across both his deck and the upturned
hull forming a bridge. The victim lifts his legs up into his overturned kayak, seating
himself firmly in it by bracing with his knees. He then reaches his hands into the air and
the rescuer grabs the victims nearest wrist and places the attached hand on the paddle
shaft "bridge" between the kayaks. The victim lifts himself up with both hands
by pulling down on the paddle shaft. The victim needs to be careful not to bump his head
on the rescuers kayak as he comes up between the boats. The rescuer helps lift the victim
upright if necessary. If the victim begins entering the cockpit from a position between
the kayaks he can probably reenter the kayak with his face always out of water by holding
on to the paddle bridge and tilting the cockpit towards him as he re-enters it. This is
good because it can be very difficult to persuade a frightened victim to put his head back
under water.
The paddle bridge stabilizes the rescuer as well so he can lean on the paddle and exert
quite a lift in order to help the victim to the upright position. Once upright the rescuer
and victim can both pump (if each has a pump) or take turns pumping rapidly while
stabilizing the kayaks for each other.
The Eskimo Side Rescue is easier and more stable for the rescuer than the simple
Assisted Rescues that follows, but it may be harder for an unpracticed victim to
understand what they are to do, especially if they are going to have to put their head
back under water.
ASSISTED RESCUES:
THE SIDE RESCUE
Pull up alongside the victims kayak.
The rescuer grasps the cockpit of the victim's craft (once it has been righted, hopefully
by a method described already that minimized water entry) and holds it down against the
leverage of the victim pulling his body up across the back deck. At this point the rescuer
must be ready to lift up on the coaming as well as push down if the victim overbalances,
tipping his kayak toward the rescuer. The victim should move slowly and deliberately since
this is a weak point of this rescue. A technique to improve stability is for the rescuer
to bridge the kayaks with one or both paddles just behind the cockpits of both kayaks (if
facing the same way) or across the rescuers cockpit and behind the victims cockpit. The
rescuer reaches his closest arm under the paddles from behind and grips the victim's
cockpit with both hands and leans his weight over the paddles towards the victims kayak.
This paddle bridge allows the rescuer to securely lean over the "bridge" to hold
down or pull up to counterbalance the victims effect on his kayak without fear of
capsizing. Instruct the victim to use the paddles as well as the cockpit rim as hand-holds
so as to not put too much torque on the kayak. The victim should get his feet on the
surface before pulling and swimming up onto his kayaks back deck as in the Mariner Self
Rescue. If the victim has any trouble getting up on the back deck the rescuer can grasp
the top of his britches with his forward hand and help him aboard.
Once on the back deck the victim can enter the cockpit like in the Mariner
Self Rescue or one of its variations. Again try to keep the center of gravity low and move
deliberately. The victim should also reach across to the rescuers kayak with one hand to
form another bridge between the kayaks and thus prevent himself from overturning towards
the rescuers kayak or falling between them. Once back in the kayaks both paddlers can help
pump. Some lightly loaded kayaks may be able to be quickly emptied by the rescuer lifting
the bow while the victim pushes down on the stern and twists the kayak some to break the
suction at the cockpit. Alternately, the victim could grasp the bow of the rescuers kayak
and pull down against its buoyancy to help lift the bow of his kayak to empty it. If you
have a third paddler they could be pushing down the stern of the victims kayak to help
raise the bow. If both paddlers are in the water one could lift the bow while using one
end of the other kayak for support. The other paddler in the water grasps the opposite
ends of the kayaks and does the same until both are emptied. If your kayak(s) can do this
it could save a lot of pumping later but it is unlikely you will be able to succeed with a
full gear load.
THE LAID BACK RESCUE
In this rescue the victim starts
between the two kayaks (therefore not a rescue for surf) facing his kayaks bow. He lays
one arm over his kayak just behind the cockpit and his other arm reaches over the rescuers
kayak preferably in front of the rescuer (which ever way the kayaks are facing) so the
rescuer can anticipate what is needed to help. Next the victim lays back and throws one
leg over each kayak. Pressing down with all four limbs he lifts his hips clear of the
water. He swings his butt over his cockpit (and if it is big enough to get his feet in
later) drops it in. With a small cockpit he would have to get both legs in the cockpit
first before sliding down into it feet first. The rescuer bridges the kayaks with the
paddles and helps hold the kayaks together and stabilize them during this process.
Conclusion
In years of flatwater
paddling and sea cruising on the Pacific Coast we have never accidentally capsized
(playing in the surf and practicing new techniques we don’t classify as accidental),
but that doesn't mean it won't happen. We go prepared. If you are an accomplished Eskimo
roller these other rescues should still be learned, and practiced, as a back-up to your
roll and so you can help someone who has failed to roll. You should always have back-ups
in place anytime safety is involved. Back up all these rescues by carrying a VHF Radio,
cell phone, EPIRB, flares, smoke signals, signal mirror, water dye, orange streamer, horn,
whistle and/ or other locating devices that can make you appear bigger, brighter,
louder or different. You should try to carry these signaling devices on your person
because, if you somehow lose contact with your kayak, attracting attention may be the only
viable option you have left.
Ó copyright 1983 & 1999
by Matt Broze
Mariner Kayaks
For those who arrived at this page from another
website's link, several other Mariner Kayaks owner's manuals are at www.marinerkayaks.com
(open the "manuals" menu). |